Cech proti cechu: Rozdiel medzi revíziami
Bez shrnutí editace |
dBez shrnutí editace |
||
| Riadok 1: | Riadok 1: | ||
== Zapojte sa do boja! == | == Zapojte sa do boja! == | ||
Váš cech bojuje proti ostatným o prežitie a silu. Vaším cieľom je rozširovať územie vášho cechu a udržať si ho, zvyšovať úroveň cechu | Váš cech bojuje proti ostatným o prežitie a silu. Vaším cieľom je rozširovať územie vášho cechu a udržať si ho, zvyšovať úroveň cechu, získať bonusy a slávu pre všetkých členov. | ||
Každý deň musíte získavať nové sektory na mape a brániť tie, ktoré už máte pod svojou mocou. Na záver dňa (po skončení odpočtu) | Každý deň musíte získavať nové sektory na mape a brániť tie, ktoré už máte pod svojou mocou. Na záver dňa (po skončení odpočtu) sú kalkulované získané skúsenosti pre cech, a tieto skúsenosti pomáhajú zvyšovať úroveň cechu. Výššia úroveň = lepšie odmeny! | ||
Verzia z 19:20, 8. október 2016
Zapojte sa do boja!
Váš cech bojuje proti ostatným o prežitie a silu. Vaším cieľom je rozširovať územie vášho cechu a udržať si ho, zvyšovať úroveň cechu, získať bonusy a slávu pre všetkých členov.
Každý deň musíte získavať nové sektory na mape a brániť tie, ktoré už máte pod svojou mocou. Na záver dňa (po skončení odpočtu) sú kalkulované získané skúsenosti pre cech, a tieto skúsenosti pomáhajú zvyšovať úroveň cechu. Výššia úroveň = lepšie odmeny!
Aby ste sa mohli zúčastniť, musíte byť členom cechu. Na veľkosti cechu vôbec nezáleží, ak ste v dobe železnej alebo vyššie, môžete sa zapojiť. Cechovné súboje samozrejme poskytujú aj body do celkového hodnotenia, čiže nemusíte vyberať medzi CvC alebo klasickými PvP vežami.
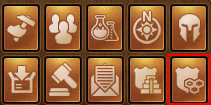
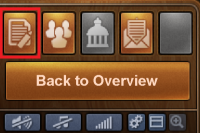
Cechové vojny sú len súčasťou prehliadačovej verzie hry
Pre sprístupnenie musíte kliknúť na ikonu vravo dole::
Mapa
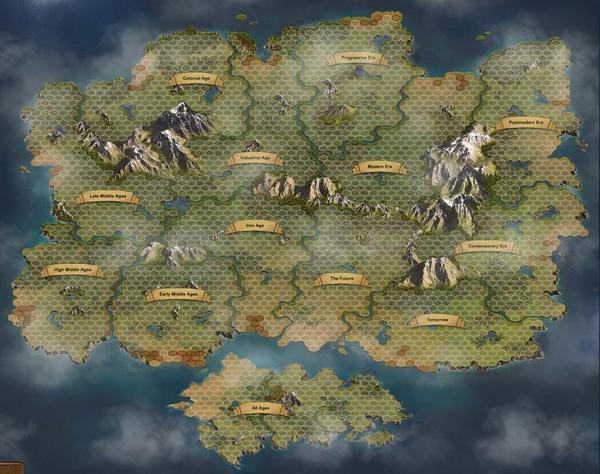
Všetka akcia prebieha na mape pre cechovné súboje, ktorá bola špeciálne navrhnutá pre tento typ bitiek. Mapa je rozdelená na provincie, ktoré sú rozdelené rôznymi hraničnými prvkami ako rieky či hory. Každá oblasť zastupuje inú dobu/éru, okrem tej úplne dole na obrazovke, ktorá predstavuje mapu pre "všetky obdobia".
Mapa poskytuje rýchly prehľad vplyvu vášho cechu v rôznych provinciách a slúži ako vstupná brána do provincií, kde bude váš cech bojovať. Na obrázku môžete vidieť oblasť pod vplyvom vášho cechu zvýraznenú zelenou farbou, a nepriateľské územie zobrazené červenou. Oranžové oblasti sú vlastníctvom tzv. jednotiek NPC (ovládané počítačom), ktoré ešte hráčske cechy nezískali pod svoju kontrolu.
Váš cech môže bojovať v jednej provincii, alebo vo všetkých... výber je na vás! Avšak, bojovať môžete len s jednotkami a tovarmi rovnakej doby, v akej je provincia, v ktorej bojujete...
Provincia bez obdobia
V spodnej časti mapy sa nachádza provincia pre všetky obdobia. V tejto provincii môžete počas bitiek použiť akékoľvek jednotky z akéhokoľvek obdobia. Na tejto mape sa nepoužívajú tovary - náklady na obliehanie a obranné armády sú platené pomocou medailí.
Provincie
Súboje sa konajú na mapách provincií. Tu viete získať nové územie obliehaním sektora a následným útokom, s pomocou svojich spolubojovníkov v cechu.
Sektory
Sektory sú zobrazené typickými šesťuholníkmi na mape provincie. Váš cech musí tieto sektory získať - a ubrániť ich pred inváziou - aby úspešne rozširoval svoje územie. Dobytie sektora prebieha v 2 fázach - najprv obliehanie, potom útok!
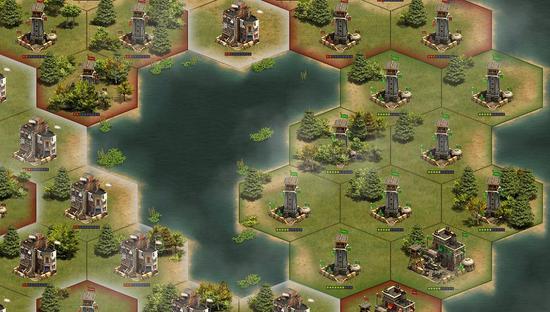
Sektory sú farebne vyznačené:
- Červená - Nepriateľský cech
- Zelená - Váš cech
- Biela - Neutrálne (NPC).
Štartovná zóna
Po otvorení mapy provincie určitej éry, uvidíte tmavé časti mapy, ktoré predstavujú nepreskúmané, nepriradené územia. Aktívna časť mapy je územie kde môžete svoju prvú armádu a založiť centrálu cechu.
Ktoré sektory napadnúť??
Pri prvom vstupe na mapu provincie, môžete umiestniť obliehaciu armádu v každom sektore štartovnej zóny (biela oblasť), alebo na sektore rieky susediacom s územím iného cechu.
Stav sektora
Na mape je vidieť či je sektor pod obliehaním, má nad sebou ikonku prekrížených mečov. Ikonka štítu nad sektorom znamená, že sektor je chránený, bol pred nedávnom dobytý a momentálne sa na neho nedá útočiť. Do chránených sektorov sa nedá umiestňovať obliehacia armáda. To znamená, že ak máte jeden chránený sektor hneď vedľa nepriateľského, ktorý chcete obsadiť, musíte počkať až vášmu sektoru skončí ochrana, aby ste do neho mohli umiestniť obliehaciu armádu.
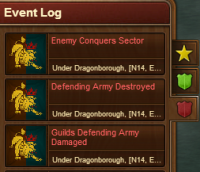
Zoznam udalostí
V prehľade udalostí vidíte akcie vykonané členmi svojho cechu a nepriateľskými cechmi. Prehľad otvoríte kliknutím na príslušné tlačidlo vľavo dole.
V prehľade sú k dispozícii 3 záložky::
- Dôležité udalosti
- Akcie vašeho cechu
- Akcie nepriateľov
Kliknutím na záložku zobrazíte aktuálne udalosti a miesto ich uskutočnenia. Kliknutím na určitý záznam vás mapa prenesie do danej oblasti.
Sektory
Informácie o sektore získate prechodom myšky ponad neho. Ak ovládate sektor, získavate "silu/moc", čo môžete vidieť v informáciach o sektore. Rôzne sektory poskytujú rôzne množstvo sily, a práve ziskom tejto sily, získavate body skúseností pre svoj cech, ktoré môžete použiť na zvýšenie úrovne cechu.
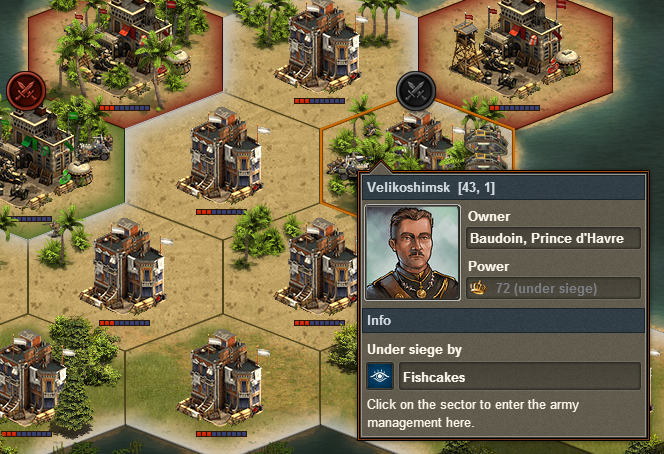
Biela farba signalizuje, že sektor ovládajú mierumilovné jednotky NPC. Môžete vidieť aj presné súradnice (užitočné pri plánovaní stratégie!), silu, alebo či je sektor pod obliehaním (prípadne kto ho oblieha).
Možnosti sektora
Po kliknutí na sektor sa zobrazia možnosti sektora, podľa toho, kto daný sektor ovláda (váš cech, nepriateľ, NPC). Na obrázku vidíte možnosti pre sektor, ktorý vlastní váš cech.
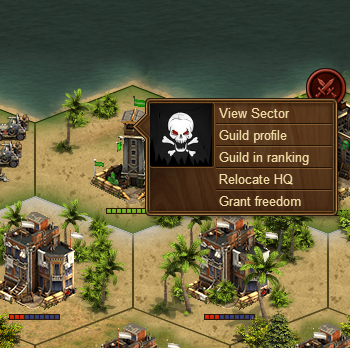
Kliknutím na profil sa dostanete do profilu vášho cechu a na Rebríček sa dostanete do hodnotenia cechov.
Premiestnenie centrály
Každý deň, je rezervný bonus aplikovaný najprv na vašu centrálu, ktorá získa najviac, a potom priľahlé sektory špirálovito vpreds. Toto robí z vašej centrály strategické centrum cechu, ktoré niekedy môžete chcieť premiestniť inam . Kliknutím môžete premiestniť centrálu na požadované miesto, avšak vždy len raz za deň. Majte na pamäti, že bonus rezervenj podpory sa pre ostatné priľahlé sektory nezmení, až do ďalšej dennej kalkulácie.
Udelenie slobody
Ak sektor nie je viac strategicky výhodný pre váš cech, môžete mu udeliť slobodu. To bude znamenať, že sektor sa dostane pod kontrolu jednotiek NPC, a váš cech za to získa tovary do cechovnej pokladnice, podľa toho aké veľké územie ovládate, a koľko obliehacích armád ste umiestnili. Každý overený člen cechu dokáže denne udeliť slobodu 4 sektorom.
Dobytie sektora
Kliknite na nepriateľský sektor a vyberte jeho prehľad (nie u NPC kontrolovaných sektoroch), a dostanete sa do okna správy armády. V pravom hornom rohu obrazovky je miesto, kde môžete umiestniť armády do sektora. Sú 2 možnosti umiestnenia armády: obliehacia armáda, a obranná armáda. Keďže sa snažíte sektor získať, vyberiete práve umiestnenie obliehacej armády.
Umiestnenie obliehacej armády
Pred začiatkom útoku, musíte najprv potvrdiť nárok na sektor, ktorý chcete získať.
Umiestnenie vašej prvej obliehacej armády stojí tovary, množstvo zistíte pri prejdení myšou nad tlačidlo umiestnenia. Po umiestnení obliehacej armády, sú vaše jednotky odobraté z vašej armády, a automaticky patria vášmu cechu a nemôžete ich získať späť!

Útok na sektor
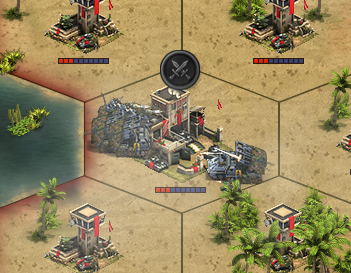
Once you have laid claim to the sector you want, and deployed your siege army, the attacks can begin to conquer it! One single attack is unlikely to be enough and it may take many successive attacks to gain control of a sector. You need to use your own army to attack... you cannot attack with the siege army. Click the red defensive icon in the army management screen to view your enemy's defensive armies.
It's possible to have up to 8 armies defending a sector, and you need to defeat them all to gain control of the sector. In this case there are two defending armies. Each time you attack, your army will fight against a random defending army (you cannot choose which army to attack). Below the army's icon, you can see the army's health bar. The armies in the picture have 8 and 9 health respectively, which means they need to be defeated 17 times total in battle to be utterly destroyed and removed from your opponent's defending armies. Beware - you need to defeat each army multiple times for it to be completely destroyed. When you have killed all of your opponent's defending armies, your siege army moves in and becomes the sector's first defending army.
HINT: After you have beaten a defending army for the first time, the units in the army become visible when you hover your mouse over the army's icon in the army management screen. Once the army has received damage, the units in that army are visible to everyone. Another guild has laid siege to the sector I want / I own
You may find that another rival guild has laid claim to a sector you want or that belongs to your guild, and placed a siege army there. All is not lost! You can attack and destroy your enemies' siege armies in much the same manner as you destroy defending armies.
After you win a sector
After you have gained control of a sector, it is protected from attack for a period of time, until the end of the "day", which is indicated by a countdown timer at the top left of the province map. When the countdown reaches zero, the day ends and scores are calculated for the previous day. The protection is also lifted. It's in your interests to hold on to a sector until the timer runs out!
Defending a sector
Every day when the countdown runs out, scores are calculated for the previous day. You need to be holding on to a sector when the timer runs out for it to count! So, it's in your interests to hold on to a sector for as long as you can, or at least until the timer reaches zero.
When you conquer a sector you start with only one defending army (which was formerly your siege army). You can place up to seven additional armies in the empty slots, making a total of eight. But you need to pay goods to unlock each army slot, and the cost increases with every slot you unlock.
As with siege armies, units deployed to defensive armies belong to your guild and cannot be retrieved. As the cost of goods rises, a single person may no longer be able to afford to unlock slots, and so goods contributing to unlock slots go into a guild treasury, which holds goods until they are ready for use.
Under siege
When one of your sectors is under siege by an enemy, the sector will not produce power. Most actions are also blocked (placing a defending army, relocate HQ or grant freedom). So, it's in your guild's interest to kill off any armies that are besieging your sectors.
Support pool
Every guild has a "support pool", which gives bonuses in GvG warfare. A guild's support pool is calculated from the guild's level and certain buildings that its members have. It gives a percentage bonus to the attack and defense of all units of that guild in this sector.
The support pool is distributed among sectors controlled by a guild, with the guild HQ taking precedence, before adjacent sectors receive a bonus, and then sectors further away after that. You can see a support bonus by hovering your mouse over an army. Defending armies and siege armies can have a support bonus if they are in range. A guild's support pool is recalculated every day, when the countdown ends.
HINT: Your guild HQ has the highest support bonus, reducing the further away you get from your HQ.
Daily calculation
The daily calculation occurs at a set time every day. You can see from the countdown in your GvG province map how much time is left until the calculation is run. During the calculation, the following steps occur:
- Guild Level calculation.
- Guild ranking calculations.
- Support Pool/Support Bonus calculation
- Power is paid out.
- Attack protection on sectors is lifted.
- If you have relocated your HQ the previous day, the relocate option is reset and you are again able to move your guild headquarter.
Guild Levels
Leveling up your guild will improve its ranking and give bonuses to all its members. Some bonuses will help your guild in the GvG maps, and there are also player bonuses to be gained. You can view information about your guild’s level, and requirements for all levels, in the guild level window, which is accessible from your guild menu icon.
To see rewards and requirements, you can scroll through the levels using the arrows at the bottom of the guild level window.
How to level up your guild
In order to level up your guild you need to gather power. You gain power by acquiring and holding onto territory. Every sector you control gives power and, at the end of each day, your guild's power points are calculated and added to your guild's total, which contribute towards leveling up your guild.
Guild bonuses - As you increase your guild's level, the following bonuses for your guild will also increase:
Prestige bonus - Adds prestige to the guild’s daily prestige ranking
Support pool bonus - Adds to the guild’s support pool (attack/defense bonus in GvG)
Player bonuses - Some levels will also provide a player bonus.
Recruitment boost - Reduces the time needed to recruit units (new times are shown in the recruitment screen), and healing times for units.
Research boost - Gives additional Forge Points each day in your town hall.
Construction rebate - Reduces coin and supply cost of all buildings by a percentage (the original cost is shown in the research tree, and the reduced cost is displayed in the building menu).
Guild rankings
Two GvG rankings exist: guild ranking, and map ranking. The guild ranking is global and determined by the amount of prestige points a guild has, which your guild can gain from the level bonuses obtained while leveling up your guild. Provinces also have their own map ranking, which is ordered by guilds' power gained in that province map. Getting to the top of the map ranking will not only increase your guild's fame and notoriety, but it also provides its own benefits.
Every day after the new map rankings are calculated, a power bonus is given to the top 3 guilds. The bonus is as follows:
Top guild - 15%
2nd place - 10%
3rd place - 5%
Guild Rights & Treasury
Guild rights
Not all GvG actions are available to all players. The following actions require the guild member to have the "trusted" right:
- Unlocking a defending army slot.
- Replacing an army
- Deploying or deleting a siege army
- Grant freedom (you can only do it 4 times per day)
- Relocate headquarter
Guild treasury
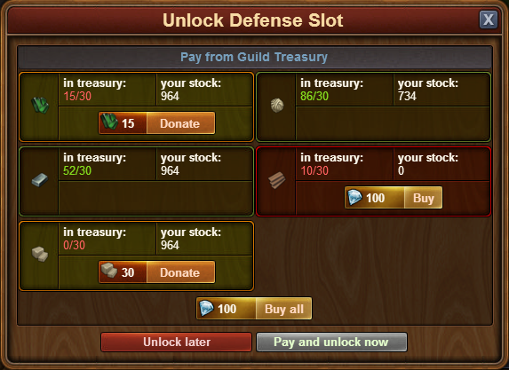
As your guild conquers and expands its territory, goods cost rise. Your whole guild may need to contribute goods to pay for new army deployment and unlock defense slots, and this is where the guild treasury comes in. When you attempt to place an army, you are first taken to the unlock screen, where you can contribute to - your guild's treasury.
In the image below, 30 iron and cloth are required, and as you can see that they are already available in your guild treasury, because the number is shown in green. Also needed are ebony, jewelry and limestone, which the guild need to collect and pay in order to unlock this slot. Buttons beside the good requirement show what you as a player are able to contribute: in this case, 15 jewelry and 15 limestone. And you could also use Diamonds to purchase ebony for your guild. Only when all required goods are available can the slot be unlocked.
HINT: Granting freedom to a sector your guild no longer wants will also result in goods being paid to your guild's treasury
You can also donate goods to your guild's treasury whenever you feel like it in the Treasury screen.
GvG Terms
Here is a list of GvG-related terms that might be useful to know:
Attack protection - After conquering a sector, it cannot be attacked until the next daily calculation. Also, unless it is a HQ, this sector does not count for placing siege armies and attacking until the next daily calculation.
Average power - The average power of a sector in the province.
Besieged, under siege - A sector that holds a siege army. Besieged sectors do not produce power, and most actions are blocked (like placing a defending army, relocate HQ or grant freedom).
Construction Rebate - According to the level of the guild, all guild members get a discount on the coins and supply costs of their buildings.
Coordinates - A unique identifier for every sector on the province map.
Daily Calculation - At the end of every day, during the daily calculation, power is paid out, and attack protection is lifted.
Defending Army - A sector can hold up to 8 defending armies. If the sector gets attacked, each of these armies has to be defeated 10 times.
Grant Freedom - When a guild “grants freedom” to one of their sectors, it and all defending armies in it will become controlled by an NPC again. The guild will gain a few goods for doing so.
Guild Continent Map - The map in which the provinces are located. Entering GvG will lead you there.
Guild Level - The accumulated power of the maps will contribute to the guild level. Whenever enough points are gathered, the guild levels up and unlocks bonuses for their members.
Guild Ranking - A ranking that displays all guilds sorted by their prestige.
Guild Treasury - The guild treasury holds goods that are contributed by the players and certain events/actions. The treasury is used to pay goods for unlocking slots or placing siege armies.
Guild versus Guild - The official name of the feature is “Guild versus Guild”.
Guild’s area - The sectors controlled by a guild in a province.
GvG / GVG - Abbreviation for “Guild versus Guild”.
Headquarter - The first sector a guild conquers on a map will hold the headquarter. The headquarter can be moved to other sectors. It is important for the distribution of the support bonuses. Also, from a headquarter siege armies can always be placed (there is no 24-hour-protection).
HQ - Abbreviation for headquarter.
Landing Zone - A defined area of sectors in every province in which new guilds entering the map can start and place their initial siege army.
Map Ranking - Every province has a map ranking that displays the guilds sorted according to their daily power.
NPC - “Non-playing character” – if a sector is not controlled by a guild, it is controlled by a NPC instead.
Owner - Either the guild or the NPCs name of whoever owns that sector.
Power - A sector produces power during the daily calculation for the guild that owns the sector.
Prestige - Prestige is calculated from the level of a guild and the daily power. It is used for the global guild ranking.
Prestige Bonus - According to the level of the guild, every day the guild will get a certain amount of prestige.
Province - The guild continent map holds the provinces in which the guilds fight. There is one province for each age, meaning only units and goods from that age are used.
Province’s age - The age of a province; according to our normal ages in the game. In a province, only goods and units from the province’s age can be used.
Recruitment Boost - According to the level of the guild, the recruitment and healing times of units are reduced for all guild members.
Relocate Headquarter - A guild can relocate its headquarter; effectively, the headquarter gets put on to another sector of their territory, as long as neither of the two sectors is under siege.
Research Boost - According to the level of the guild, all guild members receive - Every province holds a large number of sectors. Guilds battle for control of these sectors. A sector provides power.
Siege Army - One member of a guild has to place a siege army on an enemy sector first. Placing a siege army requires goods. Only after placing the siege army the defending armies in that sector can be attacked by members of the guild. Note that the siege army itself does not attack, but it can be attacked and defeated.
Support Bonus - All defending armies in a guild’s sector or a siege army can get a buff. That buff is called “support bonus”. It is calculated from the support pool, the support factor and the distance to the headquarter.
Support Factor - A unique factor for every province; support pool / support factor = total support bonus of that province
Support Pool - All guild members contribute with certain buildings to the guild’s support pool. The support pool and the support factor of a province define the total support bonus for the guild in that province.
Support Pool Bonus - According to the level of the guild, the guild’s support pool is increased.
Unlock - Opening up another slot for a defending army (up to 8 in total). This action requires goods.
Unlocked Slot - A slot that was unlocked and can take a defending army now.